Blog has moved, searching new blog...

Powered by Blogger.

Friends


34 comments

Hello my friends! This is officially my last post from Blogger. I've moved everything over to Wordpress using my own domain www.becauseiliketodecorate.com. During the move I've realized that I may have left my Google Friend Connect followers behind... and this makes me sad. Google Friend Connect remains on blogger but has been disabled on external services. For more info, click here to view google's explanation.


If you would still like to follow "because I like to decorate...", and I hope you do, please visit www.becauseiliketodecorate.com and subscribe via email or your favorite reader.

Here's a highlight on what you may have missed: (Each image links to the corresponding post)

Jane - A Contemporary Farm Table
Jack - A Sophisticated Writing Desk
Rose - A Coral Beauty
Easton - The Office Desk
The History of "Grace"


Lots of love,
Mary

I'm moving...


11 comments

to WordPress that is! You've probably noticed that my blogger site has been loading very slowly. Thus another reason that I haven't been posting much lately. I've been thinking about switching over to fix this problem as well as to increase functionality! With that said, I'm attempting to DIY, so bare with me while the site is under construction! :)  I'll be moving everything to becauseiliketodecorate.com and I'm attempting to set up all forwards and preserve all RSS feed subscriptions, etc. This should not effect your subscription to the blog. Hang in there!


Lots of love,
Mary

What do I do with all these hard boiled eggs?


No comments

Wow, what a night! After greeting a lovely client who stopped by this evening to pick up my beloved Wentworth - An Office Desk with Personality, we heard screams coming from the girls' room. Our sweet little Gabby had a gash on her eyebrow that looked like she was nearing the third round in a boxing match. The culprit? A flying little mermaid Barbie thrown from across the room. My husband is off to the ER for what most likely will be stitches for Gabby -- she's such a tough little girl!

The house is finally quiet now that Titus is asleep in his bassinet, and I've been thinking about sharing this recipe with you all week -- now's my chance! :)

Easter is getting further and further behind us. Do you have dozens of hard-boiled eggs in the fridge like me? I figure we only have a few days left of life in them, so the question is... how do we use them and avoid dumping them in the trash this weekend?

Our family has been eating a LOT healthier lately. I've altered the classic Egg Salad recipe to get rid of a lot of the unnecessary fat and add in some extra nutrients -- and boy, is it yummy! I think this version is way better than the standard and I will say for a fact that we will never go back!


Ingredients:

12 hard boiled eggs
1 avocado
3/4c Smart Balance mayonnaise
1 ear of corn
1c finely chopped red cabbage
Sea salt
Cracked pepper
2 tsp lemon juice
2 tsp mustard
Optional: garnish with paprika

1. Mash avocado with a fork and place in a large bowl. Add mayonnaise, lemon juice, and mustard. Mix together. By using avocado in the recipe, you are eliminating the need for the amount of mayo used and thus cutting out a lot of the fat content. Since mayonnaise is still in the recipe, I like to use Smart Balance mayo (much healthier alternative).


2. Chop egg whites and add to the bowl. I'll usually throw in one of the yolks for flavor. The yolks are very high in fat, so sticking to just egg whites is best.

3. Slice the corn off the ear and place in bowl. Add chopped red cabbage. The corn was left over from our Easter dinner and was a little charred from the grill -- this added great flavor! And the red cabbage had a little crunch that added just the right amount of texture to the recipe.

4. Mix everything together and add salt & pepper to taste. This is when I suggest to check the consistency and add more of an ingredient to your liking (if necessary).

5. Serve on toasted bread and garnish with a little paprika! Yum!


I hope you enjoy this recipe as much as we have! Until next time...


Lots of love,
Mary

Introducing... Titus James!


4 comments

Yes, I'm still alive! On Monday, March 19th, we were blessed with a beautiful and healthy baby boy! Let me introduce you to Titus James!

He's just perfect, and we are all doing well! He surprised us and was breech, so we were taken in for a C-section upon arrival to the hospital.

Recovery is slow but steady and I'm hoping to get back to some projects soon! My husband has to go back to work tomorrow... which means I'll have all three kids (four-years-old and under) on my own all day!

Right now, I'm just enjoying my handsome baby boy and looking forward to restoring some sort of normalcy.


Lots of love,
Mary

Passez le biscuit!


9 comments

I picked this title not because I have any biscuits to share (sorry), but because it's the only French phrase that I know. :)

I found a very ornate French-styled coffee table at one of my local thrift stores and couldn't wait to get my hands on it! I'd been waiting for a piece like this to pop up so that I could play around with layering techniques -- and she was just perfect! Take a look at the final product:

The piece had these beautiful marble-styled inlays with grey tones, so I instantly knew this was going to be a grey table. Here's the before pic when I found her in the thrift store:
The table has lots of detailing, which is what made this project so exciting! First layer: I used one coat of Annie Sloan Chalk Paint (ASCP) in Old White to highlight the detail work and the edges of the table.
Second layer: two coats of ASCP mixture. I didn't have any Paris Grey on hand, so I mixed some Pure White with Graphite to achieve close to the same color -- and it worked! Once dry, I used a medium-grade sanding block to distress all the detail and edge work. This was fun because both the white layer and the wooden base started to show through!
Third layer: one coat of Annie Sloan Clear Wax buffed to a light shine. Fourth layer: AS Dark Wax! Working with just one area at a time, I lightly brushed a tiny amount of the dark wax into the detail work and the edging then wiped off and buffed with a dry clean cloth. I just love this technique! When looking closely at the final result, you can see all the layers. It has the appearance of a perfectly aged French antique!


Lots of love,
Mary

Wentworth - An office desk with personality


14 comments

First things first... no baby yet. We're expecting our little guy any day now. I think he just wants to keep us waiting a little longer. We're dying to meet him and know what his little face looks like! Does he have a lot of hair? Is he tan like my husband or fair-skinned like me? What about his personality? We'll soon find out. I must be patient! :)

In other news, I've been busy! Projects have been completed, but I've been slacking on writing about them. Honestly, I need to hold myself to a better schedule to keep up with things. I'm working on it :)

Let me introduce you to Wentworth. He has personality and a certain "cool" factor that I'm in love with.

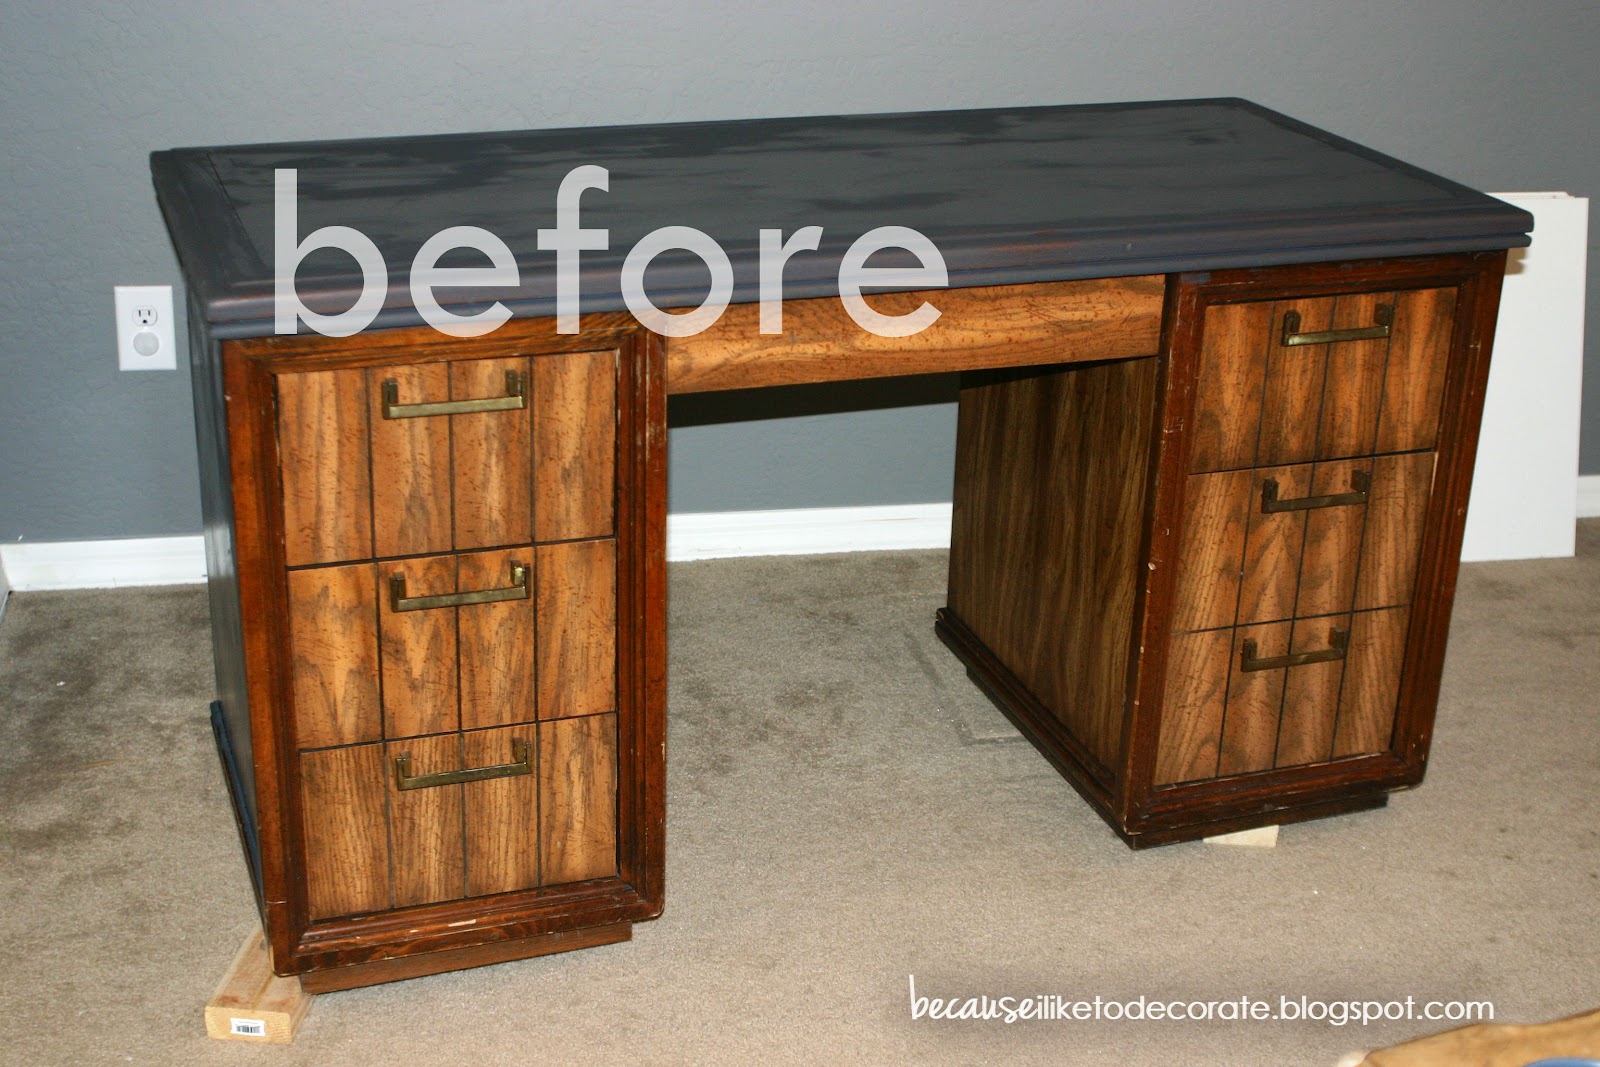
This is what he looked like before his makeover:
Yes, I did start painting before remembering the 'before pic,' but you get the idea, right? Old 60s/70s wood grain-printed MDF. Lots of dings -- or what I like to call "character." :)  But I chose this piece because of its solid construction and the fact that I liked the straight lines. Despite the wood grain print, it's a surprisingly very heavy desk with wood side gliders on each of the drawers. Something to note, when shopping for pieces to paint, I always look for wooden gliders opposed to metal. Wooden gliders will stand the test of time and show the piece's overall quality.
Stripes are ever so popular in design lately and I've been waiting for just the right piece for a wide stripe landscape. I knew immediately that this was the one when noticing the vertical grooves that were already present on the drawer fronts.
I started out with two coats of Annie Sloan Chalk Paint (ASCP) in Graphite. Then using my trusty Frog Tape, the stripes were mapped out and ready to paint. I used two coats of ASCP in Old White to achieve the bold stripe design. When dry, the piece was lightly distressed with a medium-grade sanding block. I was able to use the original brass hardware, which was one of the reasons I loved this desk to begin with. The light distressing compliments the hardware to preserve the "vintage" feel of the piece -- something I always try to do if possible.
Wentworth was finished with a coat of Annie Sloan Clear Wax and buffed to a light shine. I really like how an element of sophistication was brought out in this piece. He is handsome and oh so trendy!
If I had the right place for him, I would soooooo keep him! But thus my rule, it has to serve a purpose in my home or it has to go (whimper). Only if my kids were older, this would be a perfect homework space. Nonetheless, I've posted Wentworth on Craigslist here. Hoping he finds a Went-worthy home!


Lots of love,
Mary


Linked up here:
Furniture Feature Fridays Photobucket

Baby Boy's Room - Planning & Inspiration


1 comment

Better late than never! :)  Now that the girls' room is almost complete, I can turn my attention to my precious baby boy's room. I've been gathering inspiration and I'm super excited to share my plans with you!

I knew as soon as I saw him, the sock monkey! His cozy fabric and textures mixed with the handsome color pallet, this was going to be my handsome boy's room theme. I'm not really a "theme" room type of person. To me, themes can easily go way overboard and you find yourself surrounded by toy trains, or bears, or mickey mouse. It's a fine line to carry a theme and keep the design flowing properly. Rule #1, just because its a sock monkey, doesn't mean it gets automatic clearance into the room.


The good news is I already have all the furniture pieces needed. When we purchased Gabby's crib set, we thankfully chose a gender-neutral design. Other than that, it's a blank slate. This is going to be fun! Check out the before pics -- this is how the room looks today:

Yes, I still need to take down Gabby's drapery panel. :)  I'm thinking about keeping the brown wall colors and adding a wide stripe design using a red color. I found this stripped wall on Pinterest and just love the scale.


 I've just got three questions: #1. Horizontal or vertical?  #2. Do I bring in white to brighten up the space?  #3. What about stripes on the ceiling instead?

Turning my attention to the walls, I saw this graphic and originally wanted to use the idea for the girls' room. But thinking about it more, wouldn't this look spectacular as a pop out graphic above the crib? I would be painting either wooden or cardboard letters.


Also loving this print found on Etsy! Could I pull it off myself? Or maybe just purchase this one? It's fab! 
Source: etsy.com via Mary - on Pinterest


Adding a rustic element would be nice. I'd like to create a version of this on three scrap plywood boards...but maybe more modern/pop art styling.

Source: etsy.com via Mary - on Pinterest

I don't think I would ever take the time to try and make my own sock monkey -- not my forte. But I still love the tutorial graphic as wall art!


Now onto fabric and textures. I want to pickup the warm coziness aspect of the sock monkey. This fabric is a must!


And how do you NOT love this blanket?!


I really like the balance of this room. Very well done! The draperies are amazing and oh to get my hands on one of those little red bicycles!
Source: google.com via Mary - on Pinterest


And last but not least, the red shag rug is a must! :)

Source: google.com via Amber on Pinterest


I'm really excited to see how this is all going to come together! Stay tuned! :)


Lots of love,
Mary